DAB+ / DAB / FM Portable Radio with Bluetooth
Contents
IMPORTANT
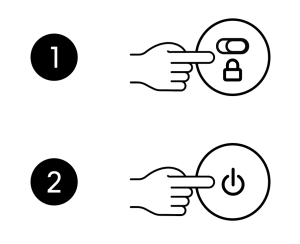
Unboxing / using your Rambler Mini for the first time: Before you can switch on your Rambler Mini, the lock switch on the rear must be switched to the unlocked position.
CONTROLS
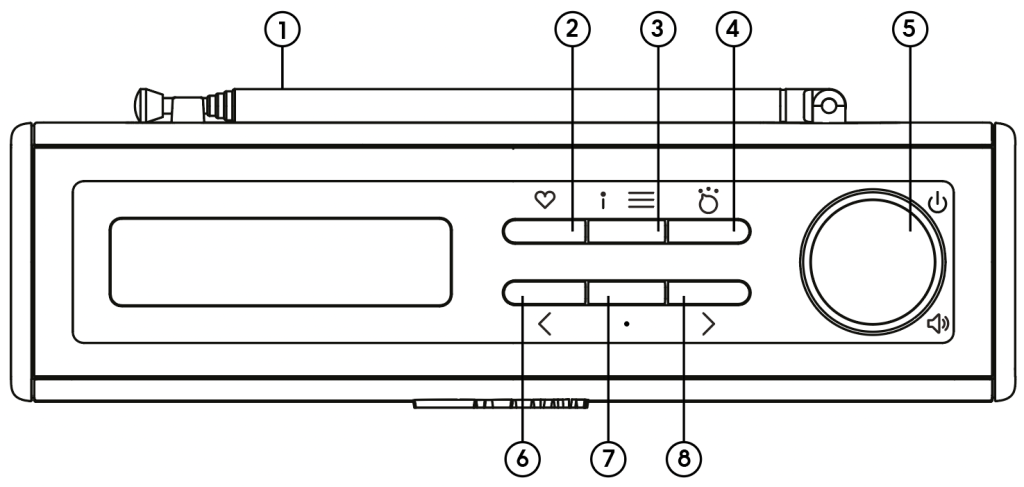
- Antenna
- Preset
- Info/Menu
- Source (Mode)
- On/Off/Volume
- Tune Down / Menu Left
- Select / Play/Pause
- Tune Up / Menu Right
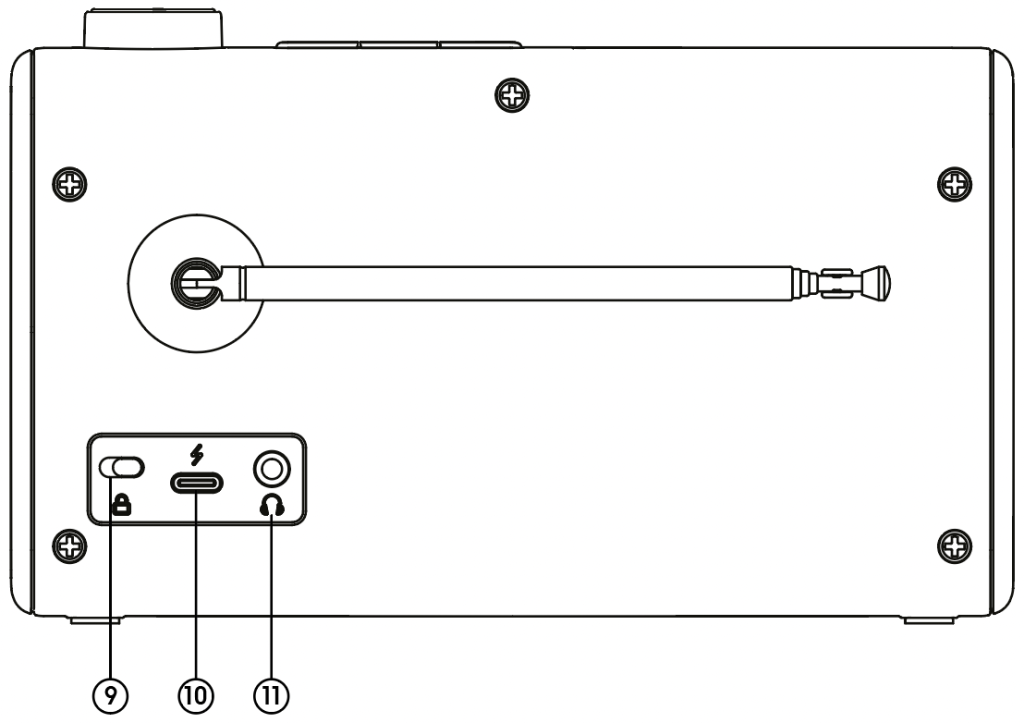
- Lock
- USB C Power socket
- Headphone socket / Line out
Quick Start Guide
Charging Your Radio
Before operating your radio for the first time, it is best to fully charge the battery. This may take up to 2 hours.
- Connect the USB C cable to the USB C socket on the back of the radio.
- Connect the other end of this USB C cable to a USB power outlet (recommended 2.1A high power USB source).
- When the battery is charging, the battery icon will be flashing. When it is fully charged, the battery icon will show solid.
The Rambler Mini can be operated by the built-in Lithium battery. During operation on battery power the approximate power level of the battery is displayed in the LCD display of the radio on the relevant info page when on, and is displayed for a few seconds when turning the radio off.
When the battery power level is very low, the battery symbol flashes on the display. Under this condition, the battery should be recharged as soon as possible to continue normal operation.
Charging time from empty to full battery is approximately 5-6 hours (at room temperature with radio in Standby mode). The unit can be charged when off or on. While playing music the charging time will be slightly longer than when off.
NOTE ON PLAYING TIME ON BATTERY POWER: The achieved playing time on battery power depends on many factors such as: selected volume level, selected music source (DAB, FM or Bluetooth), ambient temperature and age of the battery. Depending on these variables a playing time of approximately 15 to 20 hours is normal.
NOTE ON EXTENDING BATTERY LIFE: If the Rambler Mini is not used for any extended period of time, always first charge the built-in battery until it is full. The optimum working life from the built-in battery will be obtained if it is kept topped up by recharging regularly, even if it is only partially discharged. The battery’s working life will be reduced if the product is left in a discharged condition for a long period of time.
WARNING:
Do not attempt to replace or repair the built-in lithium battery. If you have any doubts about the built-in lithium battery, please contact the service department of Roberts for further assistance.
 WARNING:
- Danger of explosion if the battery is incorrectly replaced.
- Do not expose the battery to excessive heat such as sunshine, fire or the like.
- Batteries should not be disposed of by incineration and with household waste.
- Disposable batteries should be taken to a suitable recycling centre if possible.
Safety information for internal rechargeable Lithium battery
The internal rechargeable lithium-polymer battery used in this device is able to supply power for a long period of time. However, even lithium-polymer batteries can reach a point where they cannot be recharged. If the battery does not recharge after several attempts, it may be drained (have a too low charge), please contact Roberts for repair information.
If you do not want us to replace the battery, you will need to dispose of used batteries / device in accordance to the laws and regulations in your area. Please contact your local electronics retailer or recycling centre for disposal information.
Safety Precautions
- Only charge the battery in conditions between 5°C – 35°C.
- Do not attempt to disassemble unit, as the materials inside may be toxic and may damage skin and clothes.
- Do not puncture, crush, modify, throw or cause any unnecessary shock to your battery, as the battery used in this device may present a risk of fire, explosion, or chemical burn if mistreated.
- Do not leave, charge or use the battery in a car under direct sunlight, near fire or a heated source.
- Do not immerse, throw, wet the battery in water or seawater.
- Do not use or charge the battery if it appears to be abnormally hot, discoloration, deformation or abnormal conditions is detected during use, charge or storage.
- Do not leave a charging battery unattended. Keep the battery away from babies and children.
Power On/Off your Radio
- Fully extend the aerial located on the rear of your radio in an upwards direction.
- Check that the Lock switch OFF on the rear of the unit (the orange tab should be hidden).
- Push the Power / Volume dial once.
- The display will show Roberts Rambler Mini. If this is the first time it has been powered on, the unit will start to search for DAB stations.
- If no signal is found, ‘0:00’ will be displayed. It may be necessary to relocate your radio to a position giving better reception. You should then carry out a scan to find DAB stations before being able to listen to them.
NOTE: The Lock switch is useful for travelling with the radio. It means that the radio will not accidentally become switched on in transit and drain the battery or become activated in another way.
DAB Mode
When first switched on, the radio will be in DAB mode. After each use the radio will remember the mode used and then switch on in that mode the next time that it is used.
- Press and release the Source button until the DAB mode is selected. The display will show the name of the radio station currently selected.
- Press briefly the < or > button to step through the list of available stations.
- When the desired station name appears on the display, press and release the Select/Play/Pause button to select the station. The radio will select the new station.
- Adjust the On/Off/Volume knob to the required volume level.
Note: If after selecting a station the station does not connect it may be necessary to relocate your radio to a position giving better reception and/or adjusting the antenna.
Note: When first switched on, the radio will set the volume to a moderately high level, in case the broadcast is very quiet. After you have set the volume, the radio will remember the setting that you have applied for the next time that it is used.
DAB Scan – First Use
When first using DAB mode, the radio will complete a station scan. This collects the names of the radio stations available for you to choose from and stores them in memory. If none or only a few stations are available, you can manually start a scan to add stations.
- Press and hold the i/Menu button.
- < Scan > will show on the menu.
- Press Play/Select to start a DAB scan.
Note: If not enough stations appear, try moving the unit to a better location and trying again.
DAB Prune Stations
Sometimes radio stations will appear with a ‘?’ character at the start. This means that at the last scan they were not strong enough to be stored. This can happen if you take the radio to a new area with different stations. It can be good to remove these stations. Prune will remove all stations marked with a ‘?’.
- Press and hold the i/Menu button.
- Press > to highlight ‘Prune’ option.
- Press Play/Select
- Press > to highlight ‘Yes’
- Press Play/Select
Secondary services – DAB
- Certain radio stations have one or more secondary services associated with them. If a station has a secondary service associated with it, the secondary service will appear immediately after the primary service as scroll through the stations.
- To tune to the secondary service, Press the Select/Play/Pause button. Most secondary services do not broadcast continually and if the selected service is not available, the radio will re-tune to the associated primary service.
Display mode – DAB
Your radio has a range of information that can be displayed when in DAB mode:
1. Press the Info/Menu button to cycle through the info modes. All display options except the text display will revert to the date display after 60 seconds.
- Scrolling text – Displays scrolling text messages such as artist/track name etc.
- Program type – Displays type of station being listened to e.g. Pop, Classic, News, etc.
- Signal Strength – Displays the signal strength. The minimum signal marker shows the minimum signal strength needed for good DAB reception. You can use this info mode to optimise your radio reception with antenna and location adjustment.
- Multiplex Name – Displays the name of the multiplex to which the current station belongs (a multiplex is a frequency / group of radio stations).
- Frequency – Displays the frequency for the currently tuned DAB station / multiplex.
- Bit rate – Displays the digital bit rate for the currently tuned DAB station. A higher number means a higher quality digital broadcast.
- Date.
- Battery level – Displays remaining battery level.
- Sleep countdown – Displays remaining sleep time.
Start Station Scan – DAB
From time to time, new DAB radio stations may become available. Or you may have moved the unit to a different part of the country. In this case you may need to scan for new stations:
- In DAB mode, press and hold the Info/Menu button. The DAB menu will show on the display. Press the < or > button until the display shows ‘Scan’.
- Press and release the Select/Play/Pause button. Your radio will perform a scan of DAB channels. As new stations are found, the station counter on the right-hand side of the display will increase and stations will be added to the list.
Manual tuning – DAB
Manual tuning allows you to tune your radio to a particular DAB frequency. Any new stations found will be added to the station list. This function can also be used to assist the positioning of the aerial or the radio to optimise reception for a specific channel or frequency. Note that UK DAB stations are located in the range of channels 11B to 12D.
- Press and hold the Info/Menu button, the display will show DAB menu.
- Press briefly the < or > button until ‘Manual Tune’ shows on the display.
- Press and release the Select/Play/Pause button to enter manual tuning mode.
- Press the < or > button to select the desired DAB channel. Press the Select/Play/Pause button to tune to the chosen frequency.
- If a signal is present, this will be indicated on a signal strength display. The minimum signal marker ( | ) shows the minimum signal strength needed for good DAB reception.
- When a DAB signal is found, the display will show the name of the DAB station. Any new radio stations found will be added to the list stored.
- Press the Select/Play/Pause button to return to normal tuning.
Dynamic Range Control (DRC)
The DRC facility can make quieter sounds easier to hear when your radio is used in a noisy environment.
- Press and hold the Info/Menu button to show the DAB menu.
- Press the > button until ‘DRC’ shows on the display.
- Press the Select/Play/Pause button.
- Press briefly the < or > button to select the required DRC setting (default is Off).
- DRC Off – DRC is switched off, Broadcast DRC will be ignored.
- DRC Low – DRC level is set to half that sent by broadcaster.
- DRC High – DRC is set as sent by broadcaster.
- Press the Select/Play/Pause button to confirm the setting. The display will return to the station name display after several seconds.
Note: Not all DAB broadcasts use the DRC function. If the broadcast does not provide DRC information, then the DRC setting in the radio will have no effect.
FM Mode
Auto-tune – FM
- Extend the telescopic aerial.
- Press and release the Source button until the FM mode is selected.
- Press and hold the > button. Your radio will scan in an upward direction (low frequency to high frequency) and stop automatically when it finds a station of sufficient strength.
- After a few seconds, the display will update. This will show the frequency of the signal found. If the signal is strong enough and there is RDS information present then the radio will display the station name.
- You can press and hold the < button to scan the FM band in a downward direction.
Manual tuning – FM
In FM mode, press briefly the < or > button to tune to a new frequency. The frequency will change in steps of 50kHz.
If the radio is tuned to a station of sufficient signal strength with RDS information present, then the display may change to show the station name.
Display options – FM
In FM mode, your radio can display a range of information on the bottom line of the display. Press the Info/Menu button to cycle through the various modes.
- Scrolling text – Display scrolling text messages such as artist/track name, phone in number etc.
- Programme type – Display type of station being listened to e.g. Pop, Classic, News, etc.
- Frequency – Display the current frequency
- Date
- Signal strength
- Battery level
- Sleep countdown
Scan sensitivity setting – FM
Your radio will normally scan for FM broadcasts that are strong enough to give good reception. However, you may wish the Auto-scan function to also be able to find weaker signals, possibly from more distant radio transmitters. Your radio includes a local / distant option for the Auto-scan”
- In FM mode, press and hold the Info/Menu button to enter the FM menu.
- Press briefly the < or > button until ‘Scan setting’ shows on the display. Press and release the Select/Play/Pause button.
- Press briefly the < or > button to switch between ‘Local’ and ‘Distant’ options on the display. The Distant option will allow the radio to find weaker signals when scanning.
- Press and release the Select/Play/Pause button to confirm your selection. The radio will then revert to the normal information display. The setting is stored until you change it.
Note: The initial setting (out of the box, or after a System Reset) is Local – the radio will lock on to stronger signals only.
Presets (DAB & FM)
You may store your preferred DAB and FM radio stations to the preset station memories. There are 20 memory presets in your radio, 10 for DAB and 10 for FM.
Storing a Station:
- Tune to the required station
- Press and hold the Preset button
 . The display will show, for example, ‘Empty 1’ if no station has been stored to that preset.
 - Press briefly the < or > button to select the desired preset station number or existing station that you wish to replace with the currently playing station.
- Press the Select/Play/Pause button, the station will be stored under the chosen preset and the display will show ‘Favourite Stored’.
Recalling a preset station
- Press the Preset button . The display will show, for example, ‘Empty 1’ if no station has been stored to that preset. If a preset has been stored, then the display will show either the station name (for DAB stations) or the frequency (for FM stations).
- Press briefly the < or > button to select the desired preset station.
- Press the Select/Play/Pause button, your radio will tune to the chosen preset station stored in the preset memory.
Bluetooth
The Bluetooth mode on your radio allows you to play audio from Bluetooth devices such as your mobile phone or computer. When a Bluetooth device such as your Rambler BT Mini radio is in a ‘discoverable’ state other Bluetooth devices can detect, pair with or connect to it.
- Your radio will display ‘Connecting’ when it is discoverable or when it is trying to connect to a previously paired Bluetooth device.
- When a device is paired with and connected to your radio, the Bluetooth indicator icon on the display will remain on.
Connecting Bluetooth
- Ensure that the Bluetooth capability on your phone, tablet or PC is enabled.
- Press and release the Source button on your radio to Bluetooth mode. The Rambler mini will attempt to pair with the last used device. If this is not available, then it will enter a discoverable state, and ‘Connecting’ will show on the display.
- Using the Bluetooth settings of your phone, tablet or PC look for new devices in your Bluetooth list. After a few seconds, you should see a device named ‘Rambler Mini’.
- Select ‘Rambler Mini’ to pair with your radio.
- Once the connection is established, your device’s name should be displayed on the Rambler Mini’s screen.
You can now begin playing music from your device through your radio.
If you are asked for a ‘passkey’ on your device to connect, enter the code ‘0000’.
Playing audio files in Bluetooth mode
When you have successfully connected your radio with your chosen Bluetooth device you can play media using the controls on the device.
Once playing has started adjust the volume to the required setting using the Volume buttons on your radio or your device – these should be linked in most cases.
- The audio player in your device may be able to respond to the Select/Play/Pause button and < > buttons to control playback. Note: Not all player applications or devices may respond to these buttons.
Connecting and reconnecting a Bluetooth device
You can only have one Bluetooth device connected to the radio at any one time although the radio will store several Bluetooth pairings in memory.
- To connect to a different device, press and hold the Info/Menu button on the radio.
- Press and release the Select/Play/Pause button while the display is showing ‘Disconnect’.
Your Rambler BT Mini radio will become ‘discoverable’ by other devices. The display will show ‘Connecting’. The radio will then be discoverable by other devices. You can now pair a new device, or connect another device that has previously been paired by selecting the Rambler mini from the device list.
Empty the Bluetooth device list
If you no longer want your Bluetooth device to be paired with your radio you can either delete the ‘Rambler Mini’ pairing on your device, or completely remove all the connected devices from the radio’s memory:
- Press and hold the Info/Menu button on the radio.
- Press and release the < or > button until the display shows ‘Clear Pairing’.
- Press and release the Select/Play/Pause button to empty all the paired mobile devices from your Rambler Mini.
Bluetooth Performance Information
A Bluetooth connection can provide a link for audio up to a distance of approximately ten metres. When pairing devices, for convenience, we recommend they should be no more than 2 to 3 metres apart.
Bluetooth is a short-range radio communication system and generally, Bluetooth devices can communicate with each other clearly within a regular-sized room or office.
Bluetooth range may be substantially reduced if the signal passes through a solid object. Human bodies, brick or concrete walls, heavy furniture or bookcases will all reduce the range of your Bluetooth devices to a greater or lesser extent. Metal pipes, foil-lined plasterboard, metal window frames, etc also affect Bluetooth signals.
WiFi networks and cordless phones generally use similar radio frequencies to Bluetooth and may interfere with one another. If any interference is noticed, then try relocating the radio or one of the other devices.
- Your Roberts Rambler Mini supports A2DP (Advanced Audio Distribution Profile) which is a stereo audio connection that streams stereo music from PCs, mobile phones etc. SBC audio codec is supported.
- Your radio supports AVRCP (Audio Video Remote Control Profile) which allows your radio to control music playback from the connected device.
Sleep function
Your radio can be set to turn off after a preset time has elapsed. The sleep setting can be adjusted between 10 and 90 minutes.
- When using your radio, press and hold the Info/Menu button to enter the menu.
- Press the < or > button until the display shows “Sleep Timer”, then press Select/Play/Pause button to enter.
- Press and release the < or > button to select the desired sleep time. The sleep setting will increase in increments from 10 minutes up to 90 minutes. A further increment will cause the sleep timer to be set to OFF which will cancel the sleep function.
- Press and release the Select/Play/Pause button. The display will exit the sleep options.
- Your radio will switch off after the preset sleep time has elapsed.
- When the sleep timer is set, the display will always show the running sleep timer, e.g. “Sleep time: 8”.
- To cancel the sleep timer and switch off your radio before the chosen sleep time has elapsed, press and release the On/Off/Volume Knob.
- To cancel the sleep timer without switching off your radio, set the sleep timer to the OFF setting.
Setting the clock
Normally your radio will set its clock automatically using the DAB radio signal. If no DAB signal is available and you need to set the time manually, please follow the procedure shown below.
- Press and hold the Info/Menu button. The menu will show on the display.
- Press briefly the < or > button until ‘System’ appears on the display. Press the Select/Play/Pause button.
- Press briefly the < or > button until ‘Time’ appears on the display. Press the Select/Play/Pause button.
- Press briefly the < or > button until ‘Set Time’ appears on the display.
- Press and release the Select/Play/Pause button to enter the manual setting procedure. The hour digits will then flash on the display.
- Press briefly the < or > button to set the desired hour.
- Press and release the Select/Play/Pause button to enter the hour setting.
- The minute digits will then flash on the display. Press briefly the < or > button to set the desired minute.
- Press and release the Select/Play/Pause button to enter the minutes setting. The day will then flash on the display.
- Press briefly the < or > button to select the current day.
- Press and release the Select/Play/Pause button to enter the day setting. The month will then flash on the display.
- Press briefly the < or > button to select the current month.
- Press and release the Select/Play/Pause button to enter the month setting. The year will then flash on the display.
- Press briefly the < or > button to select the current year.
- Press and release the Select/Play/Pause button to confirm the time setting. ‘Saved’ will show on the display before exiting the clock setup.
Automatically updating the clock
Your radio will usually set the clock time using the DAB signal. You may specify that the radio sets its clock from the DAB or FM waveband, either waveband or none. If you choose none you will need to set the clock manually.
- Press and hold the Info/Menu button. The menu will show on the display.
- Press briefly the < or > button until ‘System’ appears on the display. Press and release the Select/Play/Pause button.
- Press briefly the < or > button until ‘Time’ appears on the display. Press and release the Select/Play/Pause button.
- Press briefly the < or > button until ‘Update’ appears on the display. Press and release the Select/Play/Pause button.
- Press briefly the < or > button to choose an update option from, ‘Any, DAB, FM or No update.
- Press and release the Select/Play/Pause button to confirm your choice.
- The radio will set its time according to the information received. The radio will return to the previous menu display.
Given a good signal, the radio will update its clock to the time broadcast by the radio stations.
Display Brightness
The brightness of the display can be adjusted when the radio is in standby or when the unit is in use. In order to adapt the intensity of the display to suit the ambient room lighting when the unit is in the standby mode or in radio on.
- Press and release the On/Off/Volume Knob to switch on your radio.
- Press and hold the Info/Menu button. The menu will show on the display.
- Press briefly the < or > button until ‘System’ shows on the display.
- Press and release the Select/Play/Pause button.
- Press briefly the < or > button until ‘Brightness’ shows on the display.
- Press and release the Select/Play/Pause button, you can choose to set the brightness level either for radio on or for standby.
- For example to set the brightness level for radio on, press and release the < or > button until ‘Radio on’ shows on the display, then press briefly the Select/Play/Pause button to enter.
- Press the < or > button to select ‘High’, ‘Middle’, ‘Low’, or ‘Off’, then press the Select/Play/Pause button to confirm.
- You can repeat step 7 and step 8 to set the brightness level of standby mode.
Note: the standby screen brightness will only be shown when the radio is connected to an external power source. When on battery power, the screen will shut down to save battery charge.
Language function
Your radio can be configured to a different language. Ensure your radio is switched on.
- Press and hold the Info/Menu button. The menu will show on the display.
- Press briefly the < or > button until ‘System’ shows on the display.
- Press and release the Select/Play/Pause button.
- Press briefly the < or > button until ‘Language’ appears on the display.
- Press and release the Select/Play/Pause button to enter the language adjustment menu.
- Press briefly the < or > button until your desired language appears on the display.
- Press and release the Select/Play/Pause button to confirm your choice. The display will change to the chosen language.
System reset
If for some reason the radio is not working correctly, or you wish to clear all the Bluetooth pairings, presets etc, you can perform a system reset. This is done by entering the system menu and doing the ‘system reset’ command. This will return the radio to the factory default settings.
Headphone socket
A 3.5mm stereo Headphone Socket located on the rear panel of your radio.
Please be aware that the sensitivity of headphones can vary widely. We therefore recommend setting the volume to a low level before connecting headphones to the radio.
IMPORTANT: Do not listen to high volumes with headphones for extended periods. This can damage your hearing.
Safety
Do not allow this radio to be exposed to water, steam or sand. Do not leave your radio where excessive heat could cause damage such as in a parked car where the heat from the sun can build up even though the outside temperature may not seem too high.
- The name/rating plate is located on the base of the radio.
- Your radio should not be exposed to dripping or splashing and take care not to allow spills or splashes to reach the radio.
- The ventilation of the product should not be restricted by covering it or its ventilation openings with items such as newspapers, tablecloths, curtains etc.
- It is recommended to operate the product such that there is a minimum distance (10cm recommended) to adjacent objects in order to ensure good ventilation.
- No naked flame sources such as lighted candles should be placed on the product.
- It is recommended to avoid using or storing the product at extremes of temperature.
Specifications
- USB-C DC 5V input 1A
- Built-in Li-ion battery 3.7V, 2600mAh
- FM 87.5 – 108.0 MHz
- DAB 174.928 – 239.200 MHz
- Bluetooth version: 5.1
- Bluetooth frequencies: 2.402 – 2.480GHz
- W x H x D: 180 x 110 x 50 (mm)
- Weight: 450g
Recycling Information

What do I do with my old and unwanted unit? Our friends at Recycle Your Electricals have an electrical Recycling Locator where you can find your nearest drop-off points for electricals and batteries. see https://www.recycleyourelectricals.org.uk/
Recycle Your Electricals is a UK-wide recycling campaign motivating and making it easier for everyone to reuse and recycle unwanted electricals, ensuring we make the most of the valuable materials in them.
 Product Specific recycling information
The Rambler Mini is classed as a ‘small electrical’ item and contains a Lithium-Ion battery. Please take note of any specific sorting requirements to ensure the battery is disposed of correctly. The internal plastics have been coloured to aid automated sorting when the unit is eventually recycled.
Service & Repair
The Rambler Mini has been designed for repairability. The unit can be opened and serviced by a qualified electrical engineer if required without damage to the unit since no glues have been used to hold parts together. If more information is required about the internals or battery servicing, please contact the Roberts technical team.