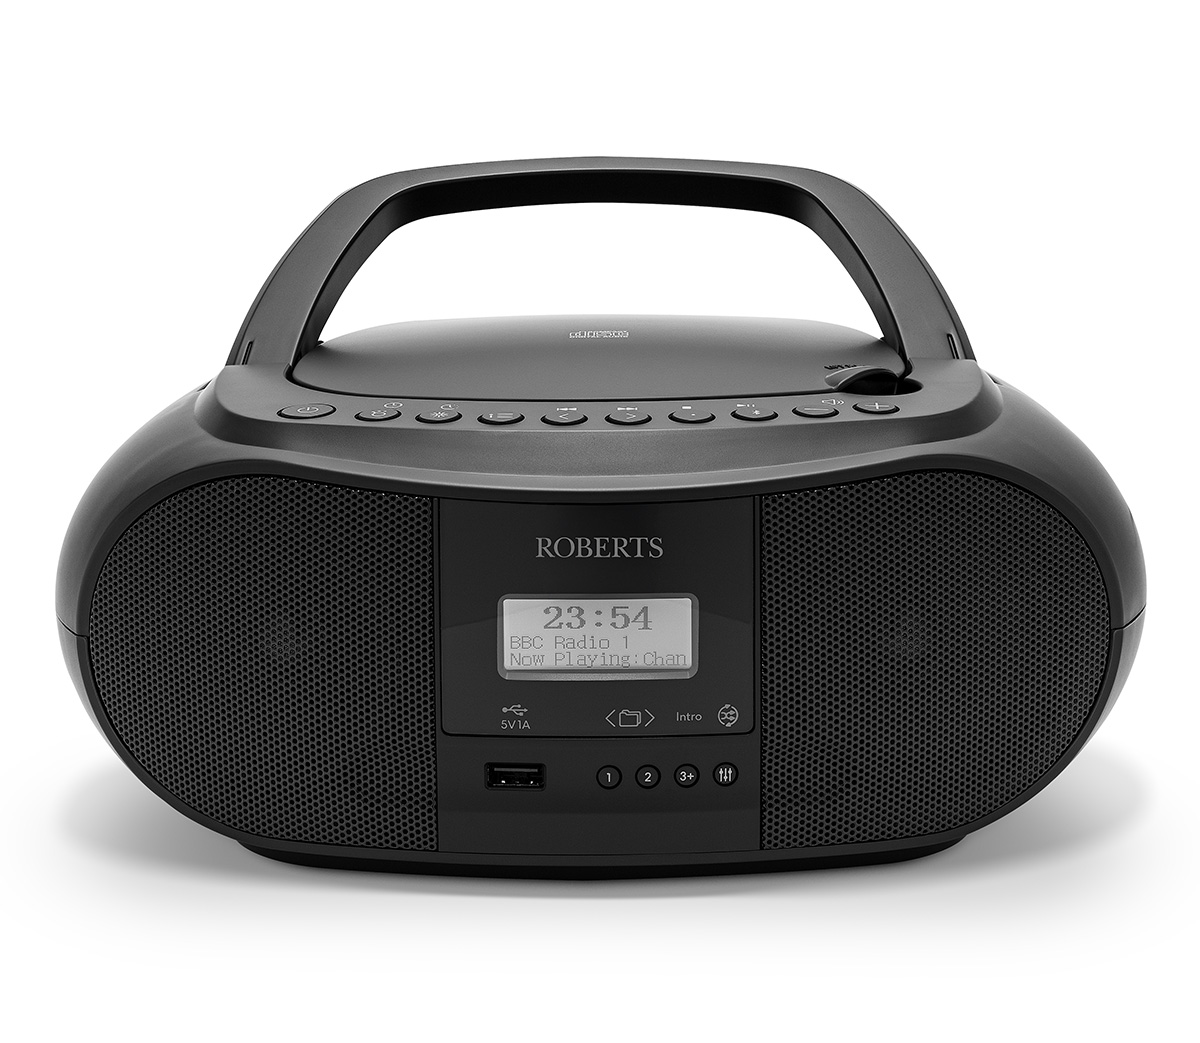
CD DAB+/FM Radio Boombox with Bluetooth
Contents
Handbook Download
Product Overview
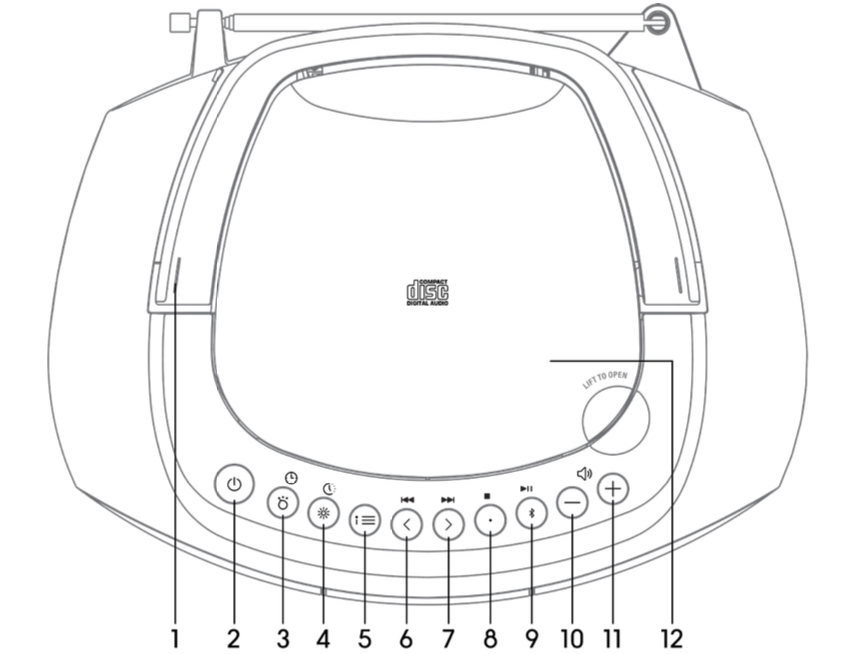
- Handle
- Standby / Sleep Button
- Mode / Clock Button
- Dimmer / Timer Button
- Info / Menu Button
- Tuning / Skip Button
- Tuning / Skip Button
- Enter / Stop Button
- Pair / Play Pause Button
- Volume – Button
- Volume + Button
- CD Door
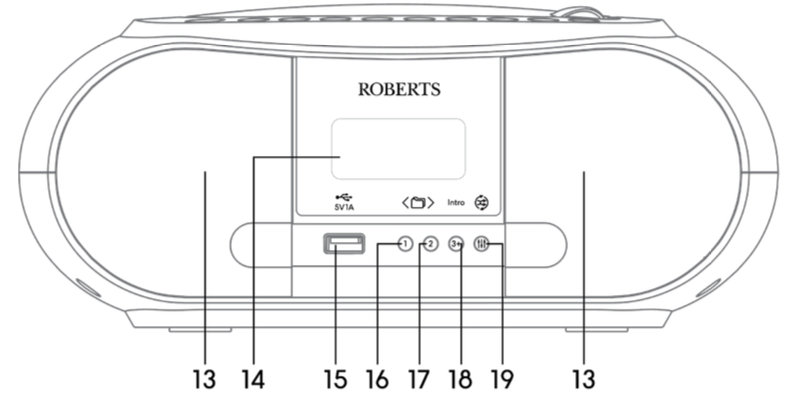
- Speaker
- Display
- 15. USB 5V
- 16. Folder − / 1 Button
- Folder + / 2 Button
- Intro/3+ Button
- Repeat / Random / EQ Button
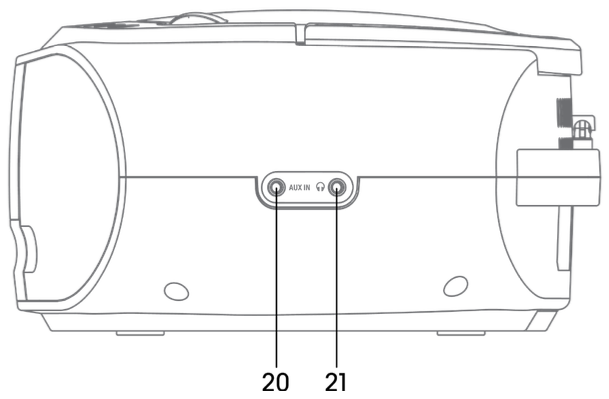
- Aux In Socket
- Earphone Jack
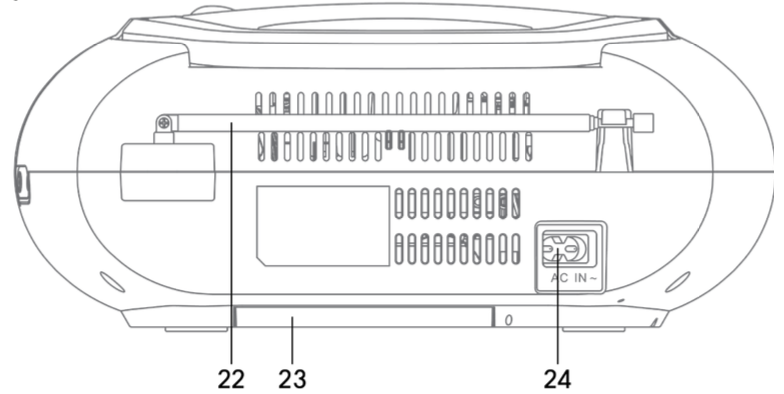
- Rod Antenna
- Battery Compartment
- AC Power Inlet
Power Source
Mains Power
Unwind the mains cable to its full length. Connect the end of the mains cable to the AC IN ~ Socket at the rear of the unit and then connect the other end to a mains outlet. Make sure the mains plug is firmly inserted into the mains socket. The unit is now ready to use.
Battery Power (Optional)
Insert 6 X 1.5V R14/C batteries (not included) correctly by following the polarity (+ or –) indications in the battery compartment.
When the batteries are completely exhausted, the power is turned off.
General Use
Powering ON/OFF
When you first connect the unit, the display will show “00:00 Scan Time” and will attempt to synchronize to the current local time if you can receive a DAB signal in your location. After approximately one minute, it will switch to Standby mode.
- Press the [STANDBY/SLEEP] button to switch the unit to ON mode.
- Press the [STANDBY/SLEEP] button to switch the unit back to STANDBY mode
- Disconnect the mains plug from the mains socket if you want to power off the unit completely.
While using battery power,
- Press and hold the [STANDBY/SLEEP] button to switch on the unit.
- Press the [STANDBY/SLEEP] button again to switch off the unit.
Selecting Modes
Press the [MODE] button repeatedly to switch between DAB, FM, CD, USB, Bluetooth® and AUDIO IN (AUX) modes.
Adjusting the Volume
Press the Volume- and Volume+ buttons to increase/decrease the volume.
System Settings
Time Setting
Auto setting the clock
− The clock can be updated automatically if you can receive a DAB signal in your location. In order to synchronize to the current local time you must leave it on the DAB station for a short period of time.
Manually setting the clock (mains power only)
During Standby mode, press the [MODE/CLOCK] button to access time setting menu.
Set 12/24 Hour
Press [<]/[>] buttons to select 12H or 24H, then press [MODE/CLOCK] button to confirm.
Set Time
- The hour digits will flash on the display.
- Press [<]/[>] buttons to adjust the hour digits, then press [MODE/CLOCK] to confirm. The minute digits will flash on the display.
- Press [<]/[>] buttons to adjust the minute digits, press [MODE/CLOCK] to confirm.
- The time is now set.
− If you cannot receive any DAB signal, you can manually set the time. Once DAB signal is received, the time will be automatically updated.
− In DC battery mode, the set time will be restored to 00:00 after power off.
Equaliser
This system supports a variety of equalizers and sound effects.
Press and hold the [Repeat/Random/EQ] button to access the Equaliser menu, then press the [<]/[>]buttons to select the EQ setting and press the [Enter/Stop] button to confirm your selection.
Display Backlight
There are four backlight levels to choose from.
To set the backlight level, repeatedly press [BRIGHTNESS] the button when the unit is switched on, and the brightness of the display will change in sequence: Off>High>Medium>Low. The backlight setting at Standby mode will follow the same setting as ON mode.
− In DC (battery) operation, the display will turn off when the radio is powered off. When the radio is on, the display will show full brightness and then go dim after 10 seconds to save power. If you press any button, it will brighten for 10 seconds.
Factory Reset
There may be times when you need to reset your unit back to the factory setting especially when you have moved house. If you experience reception problems you may want to reset and try again. If you move to another part of the country and pick up the local and national DAB stations in that area, your previously tuned channels may no longer be available.
During DAB mode, open the CD door then press and hold [Folder/2] button until display shows “FACTORY RESET”. And the factory reset will perform.
When successfully reset, it will enter STANDBY. After the system reset, all the tuned stations, DAB & FM preset stations will be erased.
Language
- To set the display language, during DAB/FM mode, press and hold the [info/menu] button to enter the menu.
- Press the [<]/[>] buttons to select <Language>, and then press the [ENTER] button to confirm.
- Press the [<]/[>] buttons to select the options and then press the [ENTER] button to confirm.
DAB Operation
If the unit is connected to the mains power and then switched on from standby for the first time, the unit will automatically enter into the DAB mode and perform an auto scan. During the scan the display will show “Scanning…” together with a progress bar and the amount of stations that have been found so far. Once the scan has finished, the unit will select the first alphanumerically found station. To explore the found stations, press [<] / [>] buttons to navigate and press [ENTER] to choose a station.
Full Scan
The full scan will search for the entire DAB Band III channels. After the scan has finished, the first alphanumerically found station will be automatically selected.
You can enter the menu and do a new scan by press and holding [Info/Menu] and selecting <Full scan>.
Manual Tune
As well as the normal method of scanning, you can also manually tune to a particular channel / frequency. This can be useful for adjusting your antenna to achieve the best possible reception and scanning a particular channel to update the station list.
- Press and hold [info/menu] to display the menu and then press the [<] / [>] buttons to select <Manual Tune>. Press the [Enter] button to confirm selection.
- Press the [<] / [>] buttons to go through the DAB channels, which are numbered from 5A to 13F.
- Press the [Enter] button to select the channel. You can then choose a station from that channel.
Save a Preset
You can store up to 30 of your favorite stations to the memory. This will enable you to access your favorite stations quickly and easily.
- To store a preset, first tune in to the station that you would like to save, then press and hold the [1] or [2] button for longer than 2 seconds, the display will show “Preset # stored” and then save the station.
- To store in Presets # (1-30) press and hold button for longer than 2 seconds, the display will show “<Save to P#>”. Press [<] / [>] buttons to select preset location and press the [Enter] button to confirm the station to save. The display will then show “Preset # stored“.
Recall a Preset
1. To listen the preset stations 1or 2, press or buttons and the unit will switch to desired corresponding preset location. If the preset has not been allocated, “Preset Empty” will be shown in the display.
2. To listen the preset stations 1-30, press button once, then press / buttons to select the stored station and press button to confirm. If the preset has not been allocated, “Preset Empty” will be shown in the display.
Prune – (Removing Unavailable Stations)
You may remove all unavailable stations from the list.
- Press and hold [Info/Menu].
- Press the [<] / [>] buttons to select “Prune” and then press the [Enter] button to confirm.
- Press the [<] / [>] to select <YES>, and then press the [Enter] button to confirm.
FM Operation
To switch the unit to FM mode, press [Mode] button repeatedly to select FM mode. The display will show the station name (or frequency if RDS not available).
Auto Scan
To scan up/down the frequency band, press and hold the [<] / [>] buttons. Once a station has been found, the scanning will stop automatically.
Manual Scan
To search for FM stations manually, press the [<] / [>] buttons repeatedly until your desired frequency is reached.
With FM radio it may be necessary to fine tune each station by pressing the [<] / [>] buttons repeatedly. Each press will decrease/increase the frequency by 0.05MHz. If reception is still poor, adjust the position of the aerial or place the unit to another location.
Scan Setting
This is a scanning option to scan all stations, or just scan stations with a strong signal.
- Press and hold [Info/Menu] button, then press [<] / [>] buttons to select <Scan Setting>. Press [Enter] to confirm.
- Press [<] / [>] buttons to select “Strong stations Only” or “All Stations”. Press [Enter] button to confirm.
Audio Setting (Stereo/Mono FM)
This unit will automatically switch between stereo and mono mode, but you can override this and switch this function manually. Set to “Forced Mono” for weak stations to improve the reception. Set to “Stereo Allowed” for better audio.
- Press and hold [Info/Menu] button, then press [<] / [>] buttons to select “Audio Setting”. Press the [Enter] button to confirm.
- Press [<] / [>]buttons to select “Stereo Allowed” or “Forced Mono” and then press the [Enter] button to confirm.
Save a Preset
You can store up to 30 of your favorite stations to the memory. This will enable you to access your favorite stations quickly and easily.
- To store a preset, first tune in to the station that you would like to save, then press and hold the [1] or [2] buttons for longer than 2 seconds, the display will show “Preset # stored” and then save the station.
- To store in Presets # (1-30) press and hold [3+] button for longer than 2 seconds, the display will show “<Save to P#>”. Press [<] / [>] buttons to select preset location and press [Enter] button to confirm the station to save. The display will then show “Preset # stored“.
Recalling a preset is done by short pressing a preset button [1] or [2] or pressing [3+] and selecting a preset from those stored.
CD Operation
Press the [MODE] button repeatedly to select CD mode.
Playback
- Lift up the top CD door to open the disc tray.
- Place the CD with the label side up into the CD compartment, and then push down the CD door to close the disc tray. The CD will playback automatically.
- If there is no disc or the disc can’t be read, “NO CD” or “UNKNOWN CD” will show on the display. 4. This unit can play CD, CD-R, CD-RW disc, and can play MP3 file format in the CD mode.
To pause playback
- Press the [Play/Pause] button to pause the playback.
- To resume playback, press the [Play/Pause] button again.
To stop playback
Press the [STOP] button to stop playback.
Skipping to another track
- Press the [<] / [>] buttons to skip backwards to the beginning of the track or previous track or skip forwards to the next track.
- Press and hold the [<] / [>] buttons to perform fast forward/reverse playback.
Repeat and Random playback
- During playback mode,press [Random/Repeat] button once, “Rep One” will show on the display. The CD will play the current track repeatedly.
- Press the [Random/Repeat] button again, “Rep All” will show on the display. The CD will play all tracks repeatedly.
- Press the [Random/Repeat] button again, “Random” will show on the display. All tracks on the disc will be played randomly. Press [<] / [>] buttons to playback the next random track. – After all the tracks have played once, the playback will stop automatically.
- Press the [Random/Repeat] button once more again, the REPEAT or RANDOM function will turn off.
Programme cancel
To cancel the programme, press the [Stop] button twice, or open the disk tray and then close it again.
Intro playback
- During playback mode,press the [Intro] button and the “INTRO” indicator will show on the display. The unit will play the first 10 seconds of each track.
- Press the [Intro] button again to resume normal playback.
USB Operation
There is a USB socket located at the front of the unit for charging your device, or for playing audio directly from USB flash media. When a USB device is connected to the unit, press the [MODE] button repeatedly to select USB mode.
The unit will automatically playback the tracks.
All playback features are the same as if you were playing an MP3 CD.
- The unit can only play MP3 file format in USB operation.
- This unit supports USB versions 1.1 and 2.0.
- The unit may not be compatible with all USB devices / memory / file formats. MS-DOS formatting is required.
Charging Your Device
The USB socket may also be used to charge your phone or power another device. Please note that the charge rate is 1A (5W).
Bluetooth Operation
The unit has a Bluetooth® function that can receive a signal within approximately 8 metres. To use Bluetooth:
- While in the ON mode, press the [MODE] button repeatedly to select Bluetooth mode.
- If the unit is not paired with any Bluetooth device, the display will flash “BT LINK“.
- Activate your Bluetooth device and select the Bluetooth search mode.
- “Zoombox 4” will appear on your Bluetooth device list.
- Select “Zoombox 4” and enter “0000” for the password if necessary.
- To disconnect the Bluetooth function, press the [MODE] button to switch to another mode or disconnect the function from your Bluetooth device.
- Press and hold [BLUETOOTH] button to put the unit into Bluetooth pairing mode (disconenct from your current device).
AUX Input
- There is an AUX IN socket located at the side of the unit. Analogue audio sound signals from other audio sources can be input to the unit through this socket.
- Connect the input to another audio device via an AUX cable (not included) with AUX IN socket.
- Press the [MODE] button repeatedly to select “AUDIO IN” mode.
- Press [-] / [+] buttons to adjust the volume control for your desired sound output level.
- In “AUDIO IN” mode, operate your connected audio device directly for playback features.
4-hour playback:
- If the unit is in “AUDIO IN” mode more than 4 hours, it will automatically switch to standby mode.
- 10 minutes before entering standby, “AUTO-OFF” will flash on the display.
- Press the [Info/Menu] button to cancel auto off function.
Sleep
Press and hold the [Standby/Sleep] button, then press [<] / [>] buttons to select the sleep delay time in minutes. Press the [Enter] button to confirm the sleep timer. After the chosen time is elapsed, the system will enter standby automatically.
Daily Timer (Mains Power Only)
This allows you to program the device to switch on and off every day at a specified time.
- In Standby mode, press [Clock/Brightness] button to enter timer setup menu. The display will show “On Timer”, and the hour digits flash.
- Press [<] / [>] buttons to adjust the hour digits, and then press [Enter] button to confirm. The minute digits will flash on the display.
- Adjust the minutes in the same way.
- When the on-time clock is set, the display will show “Off Timer” and the hour digits will flash.
- Adjust the desired time for the off timer.
- Finally press [<] / [>] buttons to select source between DAB, FM, DISC or USB mode, then press [Enter] button to confirm. The display will show “VOL#”. Press [<] / [>] buttons to adjust the volume, then press [Enter] button to confirm.
Once your times are set, you can press and hold the [Clock] button to enable or disable this function without needing to reset the times.
Safety Precautions
- Read all the instructions carefully before using the unit and keep them for future reference.
- Check that the voltage marked on the rating label matches your mains voltage.
- The unit must be placed on a flat stable surface and should not be subjected to vibrations.
- Do not place the unit on sloped or unstable surfaces as the unit may fall off or tip over.
- The mains socket must be located near the unit and should be easily accessible.
- Avoid extreme degrees of temperature, either hot or cold. Place the unit well away from heat sources such as radiators or gas/electric fires. Avoid exposure to direct sunlight and other sources of heat.
- Never place any type of candle or naked flame on the top of or near the unit.
- To reduce the risk of fire, electric shock or product damage, do not expose this unit to rain, moisture, dripping or splashing. No objects filled with liquids, such as vases, should be placed on the unit.
- If you spill any liquid into the unit, it can cause serious damage. Switch it off at the mains immediately.
- Withdraw the mains plug and consult your dealer.
- To prevent the risk of electric shock or fire hazard due to overheating, ensure that curtains and other materials do not obstruct the ventilation vents.
- Do not install or place this unit in a bookcase, built-in cabinet or in another confined space, ensure that a minimum of 10cm should be kept around the apparatus for ventilation.
Safety
– Always disconnect the unit from the mains supply before connecting/disconnecting other devices or moving the unit.
− Unplug the unit from the mains socket during a lightning storm.
− This unit will become warm when used for a long period of time. This is normal and does not indicate a problem with the unit.

The lightning flash with arrowhead symbol, within an equilateral triangle, is intended to alert the user to the presence of uninsulated “dangerous voltage” within the unit’s enclosure that may be of sufficient magnitude to constitute a risk of electric shock.
The exclamation point within an equilateral triangle is intended to alert the user to the presence of important operating and maintenance (servicing) instructions in the manual accompanying the unit.

INVISIBLE LASER RADIATION WHEN OPEN AND INTERLOCK FAILED OR DEFEATED. AVOID DIRECT EXPOSURE TO LASER BEAM.
LASER SAFETY
This unit employs an optical laser beam system in the CD mechanism, designed with built-in safeguards. Do not attempt to disassemble, refer to qualified service personnel. Exposure to this invisible laser light beam may be harmful to the human eye.
THIS IS A CLASS-1 LASER PRODUCT.USE OF CONTROLS,OR ADJUSTMENTS OR PROCEDURES OTHER THAN THOSE SPECIFIED HEREIN, MAY RESULT IN HAZARDOUS LASER LIGHT BEAM EXPOSURE.
Mains Cable
- Make sure the unit is not resting on top of the mains cable, as the weight of the unit may damage the mains cable and create a safety hazard.
- If the mains cable is damaged it must be replaced by the manufacturer, its service agent, or similarly qualified persons in order to avoid a hazard.
Interference
− Do not place the unit on or near appliances which may cause electromagnetic interference. If you do, it
may adversely affect the operating performance of the unit, and cause a distorted sound.
Supervision
− Children should be supervised to ensure that they do not play with the unit.
− Never let anyone especially children push anything into the holes, slots or any other openings in the
case – this could result in a fatal electric shock.
Service/Maintenance
- To reduce the risk of electric shock, do not remove screws. The unit does not contain any user serviceable parts. Please leave all maintenance work to qualified personnel.
- Do not open any fixed covers as this may expose dangerous voltages.
- Ensure to unplug the unit from the mains socket before cleaning.
- Do not use any type of abrasive pad or abrasive cleaning solutions as these may damage the unit’s surface.
- Do not use liquids to clean the unit.
Specifications
| Model | Roberts Zoombox 4 |
| Power Supply | AC 100-240V ~50/60Hz, 18W |
| Bluetooth version | V5.0 |
| Maximum Transmitted Power | <10 dBm (EIRP) |
| Output Audio Power | 2×1.5W RMS (Analogue) |
| USB Power Outlet | 5V 1A |
| Frequency Range | DAB+ 174-240 MHz FM 87.5 – 108 MHz |
| Compact Disc | Frequency Response: 20 Hz – 20 kHz |
| Operating Temperature | 5°C to +35°C |
| Unit Dimension | approx. 270 mm (W) x 212 mm (D) x 116 mm (H) |
| Unit Net Weight | approx. 1.23kg |