Smart Audio System with Internet Radio / DAB+ / FM RDS / Bluetooth / CD / USB with Spotify Connect / Deezer / TIDAL / Amazon Prime Music
Contents
Quick Start Guide
International quick start guides: German | Spanish | French | Dutch
Key Features
- Internet / DAB+ / FM radio
- Streaming: Spotify, Deezer, Amazon Prime music
- Bluetooth
- CD, CD MP3 / CD WMA compatibility
- Play MP3 or WMA files via USB
- Two mid-treble speakers, two bass speakers (with ported chambers)
- Control via the UNDOK smartphone app (for Apple iOS and Android)
- 10 DAB, 10 FM presets and 40 Internet radio presets
- WiFi and Ethernet connection (Dual-band WiFi and Ethernet)
- 5 equaliser profiles plus User EQ mode
- Clock and dual alarm (wake to Radio / CD / buzzer)
- USB charging of smartphone, tablet or similar devices
- Auxiliary input and headphone socket for private listening
Controls
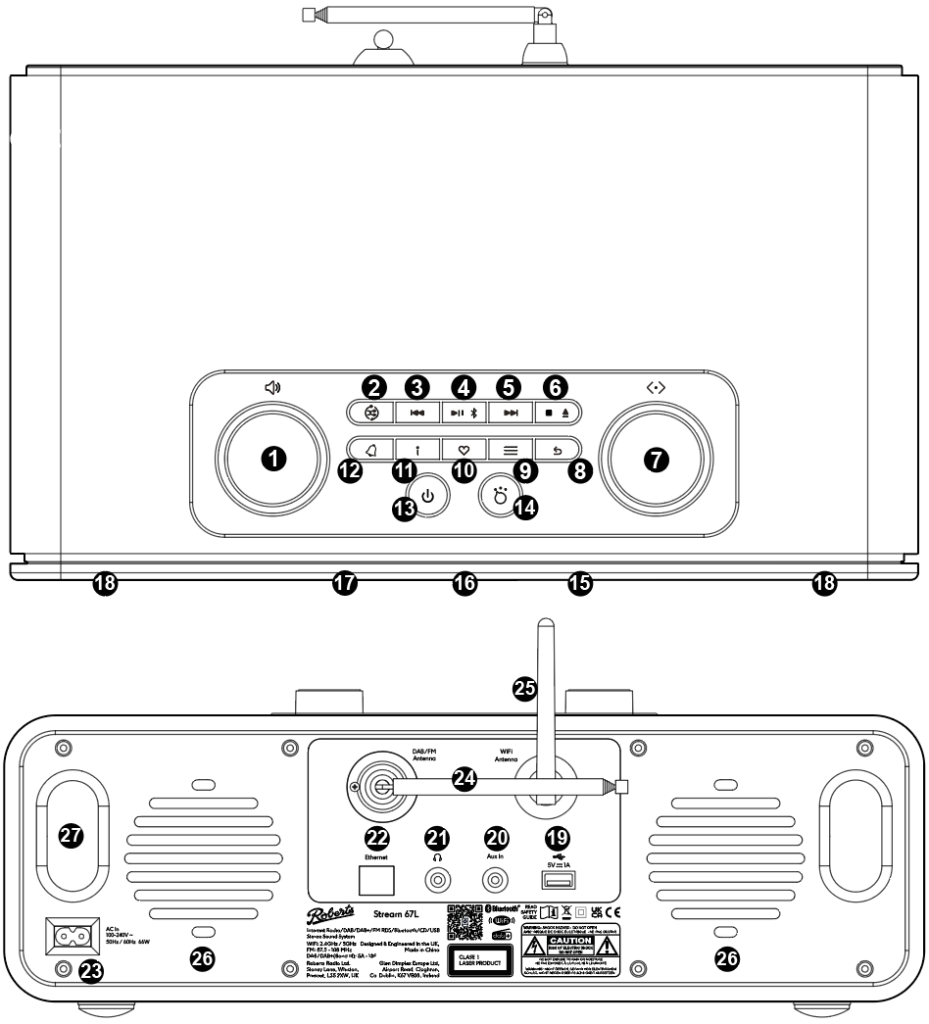
| 1. Volume 2. Repeat / Shuffle 3. Previous (RW) 4. Play/Pause / BT Pair 5. Next (FF) 6. Stop / Eject 7. Tuning / Select / Snooze 8. Back 9. Menu | 10. Preset 11. Info / Dimmer 12. Alarm 13. On / Standby / Sleep 14. Mode 15. IR sensor 16. Display 17. CD slot 18. Mid treble speakers | 19. USB playback / charge 20. Auxiliary input 21. Headphone socket 22. Ethernet socket 23. Power input 24. DAB / FM telescopic aerial 25. WiFi antenna 26. Sub-bass speakers x 2 27. Bass reflex ports x 2 |
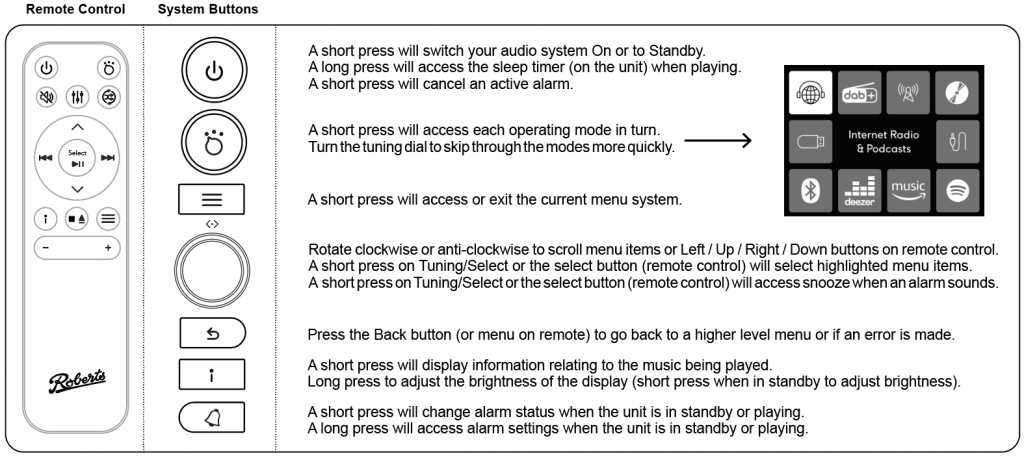
Remote Control
Remote control battery
- Remove the battery cover on the rear of your remote control by pulling the small slot on the side of the remote body.
- Insert 2 x AAA size batteries into the spaces in the compartment. Take care to ensure the batteries are inserted in the right direction as shown inside.
- Replace the cover. If the remote is not to be used for an extended period of time it is recommended that the batteries are removed.
Caution: Replace batteries only with the same or equivalent type. Danger of explosion if the batteries are incorrectly replaced.
Basic Controls
- Press and release On/Standby to switch your audio system on or off.
- Pressing the Mode button gives you access to each of the operating modes in turn. Alternatively, apply a long press on the Mode button and then use the Menu Left or Menu Right buttons (on the remote control) or turn the Tuning/Select control (on the unit) clockwise or anti-clockwise to highlight the desired menu item then press Select to select that item.
- Pressing the Menu button will access the menu system.
- Many operations require the user to make a selection from the menu. This is done using the Menu Up or Menu Down buttons (on the remote control) or the Tuning/Select control (on the unit). Press Select (or the control dial) to select that item.
- If an error is made when navigating the menus, it is generally possible to go back to a higher level menu by pressing the Menu or the Back button.
- The Info button allows the display of information relating to the radio station or music file being played.

Setup & Configuration
Your audio system may be configured using either the display and buttons on the audio system, or by using the UNDOK app.
- Place your audio system on a flat surface and plug the mains lead into the mains socket located at the rear of the audio system ensuring that the plug is pushed fully into the socket.
- If you wish to use a wired network connection, plug the Ethernet cable into the RJ-45 socket at the rear of the audio system.
- Plug the other end of the mains lead into a wall socket and switch on the socket.
IMPORTANT: The mains plug is used as the means of connecting the audio system to the mains supply. The mains socket and any multi-way mains block used for the audio system must remain accessible during normal use. In order to disconnect the audio system from the mains, the mains plug should be removed from the mains socket outlet completely.
- When you apply power, the display on the audio system will light up and show a start up screen for a few seconds.
- If this is the first time that you use your audio system (or after a Factory Reset) the display will show the language menu.
- By default your audio system will display all menus and messages in English. Press Menu Up or Down to highlight the desired language. Press Select to enter the selection. ‘Setup wizard’ and ‘YES’ will be highlighted on the screen.
- If you would like to setup your audio system using the audio system’s controls instead of the UNDOK app then press Select to select ‘YES’ and to begin setting up your audio system.
Clock and time settings
When setting the system up for the first time, it will prompt you for your preference for the clock. We recommend ‘update from network’ for the clock update method. You may also choose FM/DAB or manual time adjustment.
Alarms & Snooze
You can use the menu to set alarms that use any audio source as the wake method. When the alarm is sounding, some functions are disabled. The select button becomes a snooze button which will start the snooze timer cycle. When in snooze, the snooze time is displayed on the screen.
To cancel snooze or the alarm, press the on/standby button.
Sleep Timer
When playing any audio source, you may choose to start the sleep timer. This will play the audio for a defined time, then gradually fade out.
Audio Equaliser
The System menu contains settings for the equaliser. This contains several standard presets and a ‘normal’ setting which is the factory default for the unit tuned by Roberts acoustic engineers. Choose different acoustic settings according to your taste, or use the ‘My EQ’ setting to program your own balance of sound emphasis.
Connecting to your computer network (setup wizard)
Before you can use your Stream 67 audio system to listen to Internet radio or to music streamed from your computer, it must first be connected to your WiFi or ethernet network.
After setting the Daylight Savings options, the display will show the ‘Keep network connected?’ option. You should choose ‘Yes’ if you wish to keep the audio system connected to the network when it is in Standby mode. This will allow remote control software to switch on your audio system when needed.
If you choose ‘No’ then your audio system will shut down its connection when it is in Standby, DAB, FM, Bluetooth, CD or Aux-in modes. This minimises power consumption but it does mean that you will need to switch the audio system on manually in order to use either Spotify Connect e.g.
Setup Wizard
Press Menu Up or Down to highlight the required region (for the UK choose ‘Europe’), and then press Select to make the selection. Do this even if you are planning to use the wired Ethernet connection. Your audio system will then scan for available WiFi networks.
The audio system will enter the Network Settings Wizard and will display ‘Scanning…’.
To use the Ethernet connection to your router (with automatic configuration), press Menu Up or Down to point to the ‘[Wired]’ menu item. Press Select and the audio system will attempt to connect.
Connecting to a wireless network
When the SSID for the wireless network you wish to connect to is highlighted on the screen, press Select. If WiFi Protected Setup (WPS) was indicated, you will see an additional menu at this point.
For WPS systems: Choose one of the WPS menu options as required for your router (WPS may be via push button, or using an identification number).
- ‘Push Button’ – the display prompts you to press the WPS button on your router and then Select on the audio system. The two devices should then connect with the encryption key sent automatically to the audio system.
- ‘PIN’ – the display shows an identification number which you must enter into your router using a web browser (refer to your router’s user documentation). You should then press Select on the audio system. The two devices should then connect with the encryption key sent automatically to the audio system.
- ‘Skip WPS’ – if you wish to enter the WiFi password yourself (or if it was previously entered).
If the screen displays ‘Key:’, you will need to enter the correct password key into the audio system to allow it to communicate with your wireless network. If you do not have the WEP or WPA key, then you should obtain it from the person who set up your network.
From time to time, you may find that you need to connect to different computer networks. The Network Settings menu allows you to change your audio system’s network settings, scan for an alternative wireless network, or, manually configure the network parameters.
Configuration using ‘UNDOK’
You can download the UNDOK app from Google Play or iOS App Store. This app allows you to configure many things on the Stream67L in a convenient way on your phone or tablet.
With the UNDOK app, you can conveniently do the following from your smartphone:
- Control Internet radio stations / manage presets
- Manage podcasts
- Display WiFi configuration / details
- Set the language
- Configure the sleep timer
- Set the time/date
- Alter equaliser settings
- Factory reset
- Alter audio quality settings
Note: To enable Amazon music, you MUST log in to your account via the UNDOK app. It is recommended to use the app for Deezer.
Listening to Radio
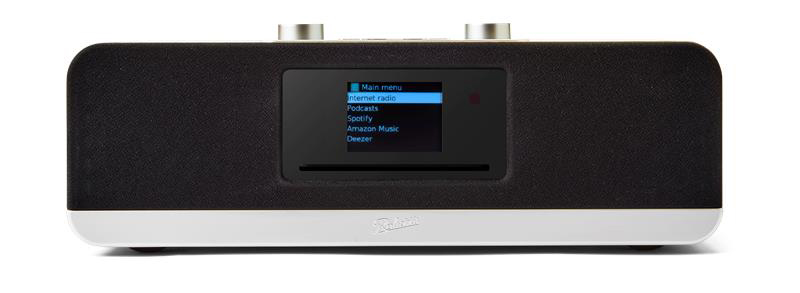
Internet Radio
When connected to the Internet, thousands of broadcasts are available for you to choose from. Selecting a station by location:
- Press ‘Menu’
- Choose Station list->Stations->Location and then scroll the list of regions.
- Choose a radio category
- Select your chosen station
In a similar way, you can choose stations by Genre, Category, Newness etc.
You can also choose to listen to podcasts using similar a similar search process. Simply choose ‘Podcasts’ when you first enter the station list menu.
Last Listened: provides a quick way to get back to the last listened station or Podcast.
DAB Radio
- Make sure that the antenna for the system is extended and the unit is in a location that can receive a strong FM/DAB signal.
- Choose DAB mode (for DAB mode, the first use will cause the system to scan for available stations to choose from).
- Turn the tuning dial to show the list of available stations.
- Press select to start listening.
If the signal is poor / reception is bad, you can press ‘info’ to display the current signal strength to check that it is high enough. This display mode is useful to help you adjust the antenna or fine-tune the system’s position.
Dynamic Range Control (DRC): Enabling DRC allows access to broadcasts that may be easier to hear in noisy environments. The best audio fidelity is heard with DRC set to OFF.
Station Order: Choose the order of stations in the list: ‘Alphanumeric’ (list alphabetically), ‘Ensemble’ (organised by DAB multiplex) or ‘Valid’ (shows only those stations for which a signal can be found).
SCAN / Prune Invalid: If the radio is moved to a new region, a scan may be needed to pick up the available stations. Stations that are no longer available will be marked with a ‘?’. Use the ‘Prune’ option in the menu to remove invalid stations.
FM Radio
Choose the FM radio mode to start listening. Ensure the antenna is well extended.
- Long press UP or DOWN on the remote control to scan to the next station. (You can also turn the tuning dial)
- Short press the UP or DOWN button on the remote to manual tune. You can double turn the tuner dial to manual tune.
Scan setting (local/distant): Local setting will only allow the scan to stop on stronger stations with a good signal. The distant setting can be used to find weaker stations that may have some interference in the background.
Stereo/Mono audio: The system will play stereo whenever a strong enough signal is present. It is an option to force the signal to play mono if a station is weaker and causes the system to alternate between stereo and mono playback (Alter the ‘Audio Setting’ option in the menu).
Info display
- Info: Press the info button to display different information about the current broadcast or station.
- Images: Slideshow images can be shown fullscreen by pressing ‘select’
Save Preset
To save a radio station (Internet, Podcast, DAB or FM), start listening to the station you want to save, then:
- Long press the preset button. The system displays a list of ‘slots’ to save the station to.
- Highlight the slot you want with the tuning dial / remote.
- Press select (push the tuning dial).
- The system will same the station in the slot for future reference.
Recall a Preset
To quickly recall a saved station, short press the preset button, then choose a slot. The system will recall the station.
Music Player (USB)
Important: Your audio system is only designed to work with USB flash memory devices. It is not intended to be connected to hard disk drives or any other type of USB device.
Audio formats supported are MP3 and WMA. USB playback does not support files encoded using WMA Lossless, WMA Voice, WMA 10 Professional, nor files of any format which have DRM protection.
Searching and playback will be more responsive if the number of files in any one folder is limited (we suggest not more than 250).
Playing files from USB memory devices
- Carefully insert the USB memory device into the USB socket on the rear of your audio system. Press On/Standby to switch the unit on. The audio system may detect that the memory has been connected, in which case it will ask whether you wish to open the folder view of the memory contents. Press Select to select ‘Yes’ and skip to step 4 below.
- To select USB playback mode press Mode as needed until the Music Player mode is selected. If needed press Menu.
- Press Menu Up or Down until ‘USB playback’ is highlighted on the display and press Select. The audio system will now list the content stored on the USB memory device. If there are many files or folders this may take a few seconds.
- Press Menu Up or Down to highlight the required folder and press Select to enter the current folder. The list of tracks in the current folder will be displayed. Alternatively, if you have nested folders (such as album folders within an artist folder) then you will simply step to the next folder level.
- Press Menu Up or Down to select the track and press Select to begin playing from the highlighted track. All files in the current folder will then be played in turn.
Playlists
Your audio system can be configured to hold a queue of up to 500 tracks in a playlist menu. The tracks or albums for the playlist can be selected from your UPnP server and from a USB memory device.
Adding a single track, entire album or folder to your playlist:
- When selecting (or when playing) a track using a UPnP server or a USB memory device apply a long press on Select and the display will show ‘Added to My playlist’.
- The track will be added to the playlist for playback later.
- When using a UPnP server or a USB memory device highlight the chosen album, artist or folder and apply a long press on Select. The display will show ‘Added to My playlist’.
- Each of the tracks within the album, artist or folder selection will be added to the playlist individually. This allows any unwanted tracks to be removed from the playlist if needed (see below).
You can view your playlist end edit it by entering the menu and choosing the ‘My Playlist’ option.
Network Audio
Spotify Connect
The audio system will appear as a Spotify connect device from Spotify players connected to your local network. E.g. when using spotify on your phone, look for the ‘speakers’ icon within the Spotify app and choose the Stream 67L to play audio. Spotify is an extremely convenient way to play audio as the Stream 67L will stream audio directly from the Internet without draining your phone’s battery or requiring you to keep the app open or active.
Prune Servers
Your unit stores details of UPnP servers that it has seen via its network connection in its internal memory. The prune servers function allows only active UPnP servers on the currently connected network to be shown when selecting ‘Shared Media’ from the Music Player menu.
Press Menu. Choose ‘Prune servers’. To remove servers that are no longer required choose ‘YES’. If you do not wish to prune servers choose ‘NO’.
Keep network connected
Your audio system has the option to shut down its WiFi or Ethernet connection when it is in Standby. This minimises power consumption but it does mean that you will need to switch the audio system on manually in order to use either Spotify Connect, the ‘Play to / Cast to Device’ function or any remote control software such as the UNDOK app. Choosing to keep the network connected will use slightly more power, but ensure the device is always available on your network to play audio on demand.
Bluetooth
Bluetooth allows an easy way to connect and play smart audio devices through your Stream 67L. Choose the Bluetooth mode and the device will attempt to connect to the last connected Bluetooth audio device. If it is not able to automatically connect, it will be available to connect.
Connect to Bluetooth
- Ensure that the Stream 67L displays ‘Looking for Device’ or similar message.
- Look in the Bluetooth connections list on your smart device for the Stream 67L
- Select it to connect.
- The device should pair and audio will be available.
In the menus you also have the option to cause the system to disconnect from a Bluetooth device and clear pairings. This will cause the system to forget all devices previously paired. Choosing this option will mean you will need to re-pair a device to play audio.
CD Player
IMPORTANT: Only use standard (full) size CDs in the Stream 67L.
The system supports standard CD-DA (digital audio) discs as well as discs containing WMA or MP3 files with a sample rate of the standard 44.1KHz.
Inserting a CD
Ensure the CD player is empty before inserting a disc. If you cannot insert a disc, apply a long press on the CD Eject button (on the top panel of the unit) to remove the CD currently in the player.
- To select the CD mode press the Mode button until ‘CD’ shows on the display or insert an audio CD.
- To eject a CD apply a long press on the CD Eject button. To reload a CD that has just been ejected, apply a long press on the Eject button.
- Insert a disc with printed side facing up into the CD slot. The disc will be loaded automatically. The unit will check the CD type and load its track list. The display will show ‘Loading’ and then ‘Reading’ as the information is read.
- If you load a disc containing MP3 or WMA files your audio system will enter the MP3 / WMA mode.
Playing a CD
- Press the Play / Pause button to start playing the disc. Audio CD – the display will show the first track number. MP3/WMA CD – the display will show the first folder and file numbers.
- Adjust the Volume to the required setting.
- To pause playing press the Play / Pause button. To resume play press the Play / Pause button again.
- To stop playback, press the Stop button.
- If you put the unit into standby mode then the next time the unit is switched on it will return to the previously played track
You can use the shuffle button to alter the repeat / shuffle settings for CD audio playback.
Headphone Output
On the front of the unit is a standard 3.5mm stereo audio jack with optimised impedance for headphones. Inserting an audio jack to this socket will disable the speaker output.
AUX Input
The rear panel features a stereo aux input calibrated to -10dB audio input levels. Choose AUX input to listen to audio being played to this input.
Software update
From time to time, new software features for your product may be developed. Your product has therefore been designed to allow its internal software to be updated using your Internet connection. Please note that updating softare may result in losing settings such as presets, alarms etc.
The ‘Software update’ option is accessed via the System Settings menu. When you select ‘Software update’ the menu will display ‘Auto check setting’ and ‘Check now’. If you want your product to check periodically for new software versions choose ‘Auto check settings’ and then choose ‘YES’. If you do not want your product to check for updates choose ‘NO’.
VERY IMPORTANT: Do not switch off the power to the audio system until the update operation is complete and the audio system has restarted, otherwise the unit may become permanently damaged.
 Cautions
- Do not allow your product to be exposed to water, steam or sand.
- Do not leave your product where excessive heat could cause damage.
- The name plate is located on the rear the audio system.
- Use only the mains lead provided with the product, or a genuine replacement provided by Roberts Radio. The use of alternative mains leads will invalidate the guarantee.
- The mains lead and audio system shall not be exposed to dripping or splashing and no objects filled with liquids, such as vases, shall be placed on the mains lead or the audio system.
- It is recommended to operate the product such that there is a minimum distance (10cm recommended) to adjacent objects in order to ensure good ventilation.
- The ventilation of the product should not be restricted by covering it with items such as newspapers, tablecloths, curtains etc.
- No naked flame sources such as lighted candles should be placed on the product.
- It is recommended to avoid using or storing the product at extremes of temperature. Avoid leaving the unit in cars, on window sills, in direct sunlight etc.
- There are no user serviceable parts inside this product.
- Do not attempt to disassemble any part of the product.
Specifications
- Mains: 100 – 240 volts AC, 50-60Hz only
- Remote control batteries 2 x AAA size
- Wired Ethernet 10/100M bits/sec via RJ45 connector
- WiFi 802.11 b, g, n or a supported with WEP and WPA / WPA2 encryption
- Compatible with 2.4 GHz and 5 GHz WiFi bands.
- Frequency Coverage
- FM 87.5 – 108MHz
- DAB 174.928 – 239.200MHz
- Bluetooth 2.402 – 2.480GHz
- Headphone socket 3.5mm diameter, stereo
- Aux In socket 3.5mm diameter, stereo
- Aerial System
- WiFi antenna
- DAB/FM Telescopic aerial
- Bluetooth standards A2DP, AVRCP
- Bluetooth codecs supported SBC and AAC
- Operating temperature range +5°C to +35°C
- USB 5V 1A output
- Operating temperature range +5°C to +35°C
Software License Information
Use of the software in this radio is subject to software license terms contained in this user manual – by using the radio, you are agreeing to comply with these license terms:
- Thompson Licensing: MP3 audio decoder
- MPEG Layer-3 audio coding technology licensed from Fraunhofer IIS and Thomson
- Fraunhofer: MPEG-4 HE AAC Audio decoder
- MPEG-4 HE-AAC audio coding technology licensed by Fraunhofer IIS: http://www.iis.fraunhofer.de/amm/
- Microsoft: Windows Media Audio decoder (WMA) & Microsoft: Real Time Streaming Protocol (RTSP): This product is protected by certain intellectual property rights of Microsoft. Use or distribution of such technology outside of this product is prohibited without a license from Microsoft.
- Spotify: Spotify Connect: see http://www.spotify.com/connect/third-party-licenses